
If you’re noticing your car isn’t running smoothly or your check engine light has popped up, the Intake Air Temperature (IAT) sensor might be the culprit. This small but vital part measures the temperature of the air entering your engine, helping your vehicle adjust fuel delivery for optimal performance.
But sometimes, the sensor can give faulty readings, causing your car to act up. The good news? You can reset the IAT sensor yourself, and it’s easier than you might think. In this guide, you’ll learn simple, step-by-step ways to reset your IAT sensor, get your car back on track, and avoid costly repairs.
Ready to take control of your car’s performance? Let’s dive in.
Iat Sensor Basics
The Intake Air Temperature (IAT) sensor measures the temperature of air entering the engine. It sends this data to the engine control unit (ECU). The ECU uses this information to adjust the air-fuel mixture and ignition timing. Proper IAT sensor function helps the engine run efficiently and reduces emissions.
Understanding the IAT sensor basics is important before learning how to reset it. A faulty sensor can cause engine problems. Knowing its role and symptoms helps in diagnosing and fixing issues early.
Role In Engine Performance
The IAT sensor affects engine power and fuel economy. It tells the ECU how hot or cold the air is. Cold air is denser and needs more fuel. Warm air requires less fuel. This balance keeps the engine running smoothly. The sensor also helps control emissions by adjusting fuel delivery.
Common Symptoms Of Faulty Sensor
A bad IAT sensor can cause rough idling and poor acceleration. The engine may hesitate or stall. Fuel consumption might increase. The check engine light often turns on. Sometimes, the engine runs too rich or too lean. These signs show the sensor may need cleaning, resetting, or replacement.

Tools Needed
Resetting the Intake Air Temperature (IAT) sensor requires certain tools. These tools make the process easier and safer. Preparing them beforehand saves time and effort. Below is a list of essential tools needed for this task.
Obd-ii Scanner
An OBD-II scanner reads and clears error codes from the car’s computer. It helps identify sensor issues quickly. After resetting the sensor, the scanner clears stored trouble codes. This tool is vital for any sensor reset process.
Basic Hand Tools
Basic hand tools include screwdrivers, pliers, and socket wrenches. These tools allow you to remove sensor covers and connectors safely. Having the right size tools prevents damage to sensor parts. Keep a small toolkit ready for easy access.
Safety Gear
Safety gear protects you during the reset process. Gloves shield your hands from dirt and sharp edges. Safety glasses prevent debris from entering your eyes. Wearing proper gear reduces injury risks while working on your car.
Preparation Steps
Before resetting the Intake Air Temperature (IAT) sensor, proper preparation is vital. It ensures safety and prevents damage to your vehicle’s electrical system. Follow these simple steps carefully to prepare your car for the reset process.
Turn Off Engine
Make sure the engine is completely off. Remove the key from the ignition. Allow the engine to cool down if it was running. This step prevents any electrical issues or injury while working on the sensor.
Disconnect Battery
Open the car’s hood and find the battery. Use a wrench to disconnect the negative terminal first. This cuts power to the sensor and the vehicle. Wait for at least 10 minutes to let the system fully reset.
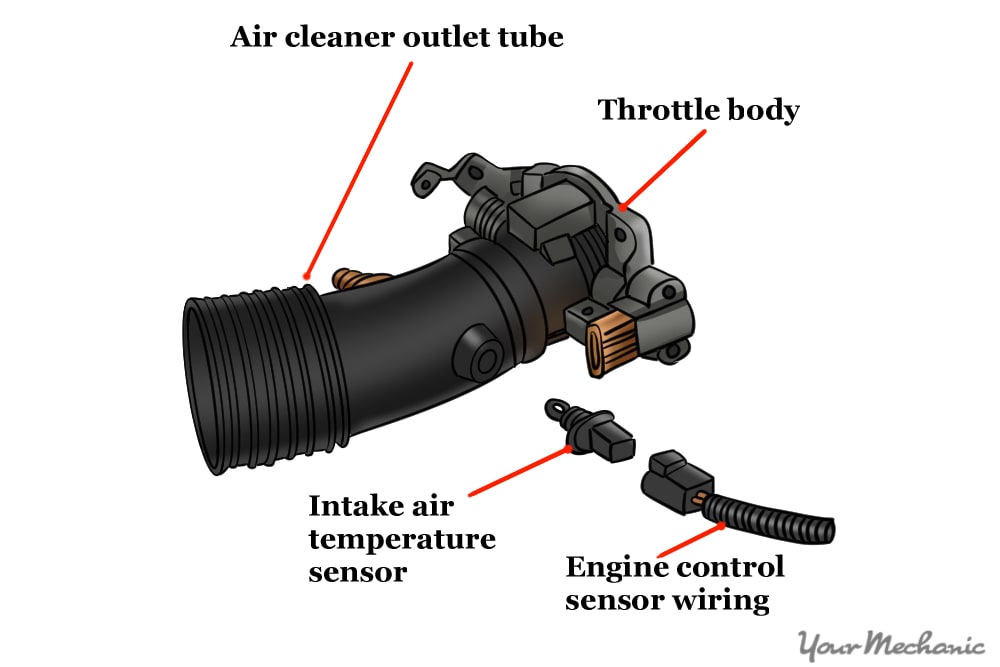
Locate Iat Sensor
The IAT sensor is usually near the air filter or intake manifold. Check your vehicle’s manual for the exact location. It is a small sensor with an electrical connector. Identifying the right sensor avoids mistakes during the reset.

Resetting The Iat Sensor
Resetting the Intake Air Temperature (IAT) sensor helps your vehicle’s engine run smoothly. This sensor measures the air temperature entering the engine. Over time, it may give incorrect readings due to dirt or electrical issues. Resetting clears errors and lets the sensor recalibrate. Here are simple ways to reset the IAT sensor.
Battery Disconnect Method
Turn off the engine and remove the keys. Open the hood and find the negative battery terminal. Use a wrench to loosen and disconnect the negative cable. Wait for about 10 to 15 minutes. This pause clears the sensor’s memory. Reconnect the cable tightly. Close the hood and start the engine. The sensor resets and starts fresh.
Using Obd-ii Scanner To Clear Codes
Locate the car’s OBD-II port, usually under the dashboard. Plug in an OBD-II scanner and switch it on. Follow the scanner’s menu to read engine codes. Find codes related to the IAT sensor. Select the option to clear or erase these codes. Remove the scanner and start the car. The sensor resets as the codes clear.
Manual Sensor Reset Techniques
Find the IAT sensor, often near the air filter or intake manifold. Carefully unplug the sensor’s electrical connector. Wait for about 5 minutes to let it reset. Reconnect the sensor securely. Some cars need a short drive to recalibrate the sensor fully. Check if the engine runs better and no warning lights appear.
Cleaning And Inspection
Cleaning and inspecting the Intake Air Temperature (IAT) sensor plays a key role in restoring its function. Dirt and grime can block the sensor, causing wrong temperature readings. This leads to poor engine performance and higher fuel use. Regular cleaning helps the sensor work accurately and lasts longer.
Follow these simple steps to clean and inspect the IAT sensor safely and effectively.
Remove Sensor Carefully
Turn off the engine and let it cool down. Locate the IAT sensor, usually near the air filter or intake manifold. Disconnect the wiring connector gently without pulling wires. Use a small wrench or socket to unscrew the sensor. Handle it with care to avoid damage.
Clean Sensor Surface
Use a clean, soft cloth or cotton swab to remove dirt. Spray a small amount of electronic cleaner or isopropyl alcohol on the sensor surface. Avoid harsh chemicals or water that can harm the sensor. Let it dry completely before reinstalling. Cleaning removes contaminants that affect sensor accuracy.
Check Wiring And Connectors
Inspect the wiring harness for cuts, cracks, or corrosion. Look closely at connectors for bent pins or dirt buildup. Clean connectors with electrical contact cleaner if needed. Ensure all connections are tight and secure. Good wiring prevents false signals and sensor errors.
After Reset Procedures
After resetting the IAT sensor, certain steps ensure your vehicle’s system works correctly. These procedures help the sensor recalibrate and provide accurate air temperature readings.
Follow these steps carefully to avoid errors and improve your car’s performance.
Reconnect Battery Properly
Secure the battery terminals tightly. Start with the positive terminal first. Then attach the negative terminal. Ensure no corrosion or dirt blocks the connection. A good connection helps the vehicle’s computer restart correctly.
Start Engine And Monitor
Turn on the engine and let it idle for a few minutes. Watch for any warning lights on the dashboard. Check if the engine runs smoothly without hesitation. This step allows the car’s system to recognize the reset sensor.
Test Drive For Calibration
Drive the car at different speeds for about 10 to 15 minutes. This helps the sensor adjust to real-time conditions. Avoid sudden acceleration or harsh braking. The sensor will recalibrate, improving fuel efficiency and engine response.
Troubleshooting
Troubleshooting an Intake Air Temperature (IAT) sensor reset may not always be straightforward. Sometimes, the sensor still shows issues even after a reset. This section helps you find the cause and next steps. Follow these simple checks to ensure your sensor works properly.
Sensor Still Malfunctioning
After resetting, the sensor might still fail to work correctly. Check the wiring for any loose connections or damage. Dirt or debris on the sensor can cause wrong readings. Clean the sensor gently using a soft cloth. Test the sensor again after cleaning. If problems persist, deeper inspection is needed.
Check For Additional Fault Codes
Use an OBD-II scanner to check for extra fault codes. These codes help identify related engine or electrical issues. Clear all error codes and see if they return. Persistent codes may point to other components causing sensor problems. Address these faults before retrying the reset.
When To Replace The Sensor
Replacing the IAT sensor becomes necessary if it still malfunctions after cleaning and resetting. Sensors wear out over time and lose accuracy. A faulty sensor can affect engine performance and fuel efficiency. Buy a compatible sensor for your vehicle model. Replace it carefully, following manufacturer instructions for best results.
Preventive Maintenance
Preventive maintenance keeps your IAT sensor working well. It helps avoid sudden failures and costly repairs. Small steps regularly improve sensor life and car performance. Focus on cleaning, battery care, and protecting the sensor from damage.
Regular Sensor Cleaning
Keep the IAT sensor clean for accurate readings. Dirt and grime block air flow and affect sensor data. Use a soft cloth or brush and mild cleaner. Avoid harsh chemicals that can harm the sensor. Clean the sensor every few months or after dusty trips.
Battery Health Checks
Check your car battery often to support sensor function. Low battery voltage causes sensor errors and poor engine response. Test battery voltage with a multimeter. Replace weak batteries to maintain steady power to the IAT sensor. Healthy battery means reliable sensor signals.
Avoiding Sensor Damage
Protect the IAT sensor from physical harm and exposure. Avoid hitting the sensor during repairs or cleaning. Do not pull or twist sensor wires. Keep water and oil away from the sensor area. Use caution near the sensor to prevent costly damage and sensor failure.
Frequently Asked Questions
How Do You Reset An Air Intake Sensor?
To reset an air intake sensor, turn off the engine and disconnect the negative battery terminal. Wait 10-15 minutes, then reconnect it. Start the engine and drive for a few minutes to allow the sensor to recalibrate. Use an OBD-II scanner to clear error codes if needed.
What Happens If You Unplug An Iat Sensor?
Unplugging an IAT sensor causes the engine to run inefficiently. The ECU may use default values, leading to poor fuel economy and performance. It can trigger a check engine light and affect emissions. Always repair or replace a faulty IAT sensor promptly to maintain engine health.
How Do I Reset The Ambient Temperature Sensor?
To reset the ambient temperature sensor, turn off the vehicle and remove the negative battery terminal. Wait 5-10 minutes, then reconnect it securely. Start the car and drive briefly to allow sensor recalibration. Clean or replace the sensor if issues persist.
How Do I Reset My Car Sensors?
To reset car sensors, turn off the engine and remove the key. Disconnect the negative battery terminal. Wait a few minutes, then reconnect the positive terminal first, followed by the negative. Start the car and drive briefly to recalibrate sensors.
Use an OBD-II scanner to clear error codes if needed.
What Is An Iat Sensor And Why Reset It?
An IAT sensor measures air temperature entering the engine. Resetting can fix faulty readings.
Conclusion
Resetting the IAT sensor is simple with the right steps. Always turn off the engine before starting. Disconnect the battery’s negative terminal, wait a few minutes, then reconnect it. This helps clear any stored errors. After reconnecting, take a short drive to let the sensor recalibrate.
Check for any warning lights on the dashboard. If problems continue, inspect the sensor and wiring for damage. Cleaning the sensor can also improve accuracy. Using an OBD-II scanner to clear codes can help too. Replace the sensor if it still does not work properly.
Following these steps keeps your car running smoothly.