If your amplifier isn’t working the way it should, you’re probably wondering how to reset it quickly and safely. Whether your amp has gone into protect mode, stopped responding, or is acting glitchy, knowing the right steps to reset it can save you time, money, and frustration.
In this guide, you’ll discover simple, clear instructions to get your amplifier back to its best performance. Stick with us, and you’ll learn how to troubleshoot common issues, avoid damage, and restore your sound system’s full power in no time.
Ready to fix your amp? Let’s dive in.
Signs Of Amplifier Issues
An amplifier works hard to deliver clear, powerful sound. Signs of amplifier issues help catch problems early. Spotting these signs saves time and money on repairs. Recognize them quickly to keep your audio system running smoothly.
Protection Mode Indicators
Many amplifiers have a protection mode to avoid damage. A red or blinking light often signals this mode. The amp may shut down or stop playing sound. This indicator shows internal problems or wiring faults. Check the manual for your amp’s specific warning lights.
Physical Damage And Smells
Look for visible damage like cracks, dents, or loose parts. Burn marks or melted plastic are serious warning signs. Strange smells such as burning or melting plastics indicate overheating. These symptoms point to internal faults or short circuits. Turn off the amp immediately if you notice these issues.
Audio Distortions
Listen for crackling, buzzing, or popping sounds from speakers. Distorted or weak audio may mean the amplifier is failing. Sudden volume drops or loss of bass also suggest problems. These audio issues often warn of internal damage or loose connections. Test your system regularly to catch these early.
Credit: support.bose.com
Initial Preparations
Before resetting your amplifier, some key steps help ensure safety and avoid damage. Preparing your amplifier properly sets the stage for a smooth reset process. Follow these initial preparations carefully.
Power Down And Unplug
Turn off the amplifier using its power switch. Unplug the power cord from the outlet. This prevents electrical shock or further damage. Wait a few minutes before proceeding. This pause lets the device cool down and discharge any stored electricity.
Check Ventilation
Make sure the amplifier has enough space around it for air to flow. Remove any objects blocking vents or fans. Proper ventilation prevents overheating, a common cause of amplifier issues. Clean dust from vents using a soft brush or compressed air. Good airflow keeps the amplifier running safely.
Inspect Wiring And Connections
Look closely at all wires connected to the amplifier. Check power, ground, speaker, and remote wires. Ensure none are frayed, loose, or damaged. Tighten any loose connections carefully. Use the correct wire gauge for your system. A poor ground or bad wire can cause problems. Fixing wiring issues before reset saves time and frustration.
Resetting The Amplifier
Resetting the amplifier is a simple process that can fix many common issues. It helps clear errors and restore normal function. Follow each step carefully for the best results.
Disconnect Speakers
Start by unplugging all speaker wires from the amplifier outputs. This prevents any shorts or faults during the reset. Disconnecting speakers isolates the amp and helps identify if a speaker or wire causes the problem.
Power Up And Test
Turn the amplifier on without any speakers connected. Watch for lights or sounds that show it is working. If the amp works fine, the problem likely lies with the speakers or speaker wiring. If the amp stays in protect mode, continue to the next step.
Remove Rca Inputs
Next, unplug the RCA cables from the amplifier. These cables carry the audio signal from your head unit or audio source. Power the amp on again with no RCA connections. If the amp resets and works, the issue is with the RCA cables or the head unit.
Test Power And Ground Wires
Check the power wire size and the ground connection. The power wire should be thick enough to handle the amplifier’s current. The ground wire must be short and securely attached to bare metal. Loose or poor connections can cause faults and prevent the amp from resetting.

Credit: kms.boseprofessional.com
Troubleshooting Speaker Issues
Speaker problems often cause amplifier issues. Troubleshooting these can save time and money. Start by isolating the cause to speakers or wiring. Follow simple steps to find the fault quickly. This helps avoid unnecessary repairs or replacements.
Test Speakers Individually
Disconnect all speakers from the amplifier. Connect one speaker back and turn on the amp. Listen for sound or distortion carefully. Repeat with each speaker to find the faulty one. This method isolates which speaker causes the problem.
Check Speaker Wires
Inspect all speaker wires for damage or loose connections. Look for cuts, frays, or exposed wire strands. Make sure wires are tightly connected at both ends. Replace any damaged wires with the correct gauge. Poor wiring often causes signal loss or shorts.
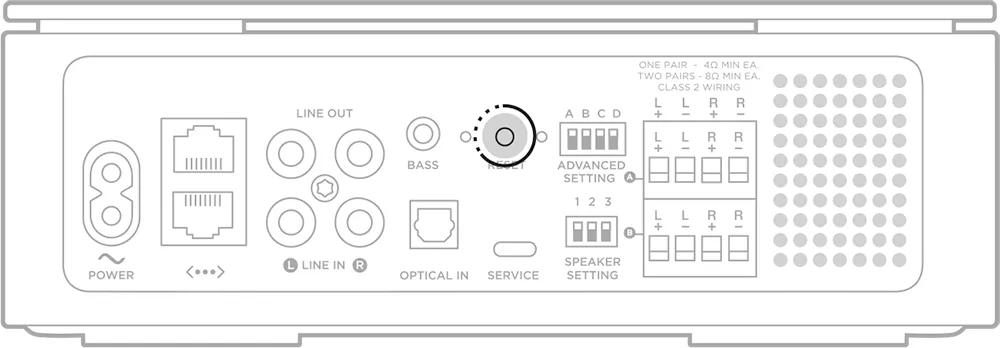
Match Impedance Settings
Check the amplifier’s impedance settings carefully. Match the amp’s Ohm rating with the speaker’s impedance. Incorrect matching can trigger protection mode or reduce sound quality. Adjust settings according to the amplifier manual. Proper impedance ensures safe and clear audio output.
Adjusting Amplifier Settings
Adjusting amplifier settings is crucial for optimal sound and system safety. Proper settings help avoid damage and ensure clear audio output. Taking time to set gain levels and verify impedance can prevent many common issues with amplifiers. These steps make your amplifier work efficiently and last longer.
Set Proper Gain Levels
Gain controls the amplifier’s input sensitivity. Setting it too high causes distortion and speaker damage. Too low gain results in weak sound. Start with the gain knob at the lowest level. Slowly increase it while playing music at a normal volume. Stop increasing when the sound is clear and loud enough without distortion. Proper gain setting balances volume and sound quality.
Verify Impedance Compatibility
Impedance is the resistance speakers offer to the amplifier. Mismatched impedance causes poor sound or amplifier damage. Check your speaker’s impedance rating, usually 2, 4, or 8 ohms. Match this with the amplifier’s rated output impedance. If the amp supports multiple impedance levels, select the correct one. Correct impedance ensures stable performance and prevents overheating or protection mode activation.
Dealing With Internal Faults
Internal faults in an amplifier can be tricky to handle. These issues affect the amplifier’s performance and may cause it to stop working. Knowing how to spot and deal with these faults is important for keeping your sound system safe.
Some internal problems are simple to fix with a reset. Others need careful attention or expert help. Understanding the signs and knowing when to call a professional can save time and money.
Signs Of Internal Damage
Internal damage often shows clear signs. One common sign is the amplifier going into protect mode repeatedly. This mode stops the amp from working to avoid further damage.
Another sign is strange noises like crackling or distortion in the sound. The amp may also get very hot quickly, or it might not turn on at all.
Burning smells or visible damage inside the amp’s casing also point to internal faults. Flickering lights on the amp’s display can be a warning too.
When To Seek Professional Repair
Simple fixes like checking wires or fuses can be done at home. Still, internal faults often need a professional touch. If the amp stays in protect mode after resets, it needs expert care.
Do not open the amplifier if you lack experience. Internal parts can be delicate and dangerous. A technician can properly test components and replace damaged parts.
Seeking repair early prevents more damage and keeps your system safe. Professionals also ensure your amplifier runs smoothly after repair.
Preventing Future Problems
Preventing future problems with your amplifier is crucial for long-lasting performance. Small steps can protect your device from damage and reduce the need for resets. Taking care of wiring, grounding, and heat management helps keep the amplifier safe and stable. Follow these simple tips to avoid common issues and enjoy clear sound every time.
Ensure Proper Wiring Gauge
Using the correct wiring gauge is essential. Thin wires cause voltage drops and stress the amplifier. Choose wires that match the power requirements of your system. Thicker wires carry current better and reduce heat buildup. This helps maintain stable power flow and prevents damage to internal components.
Maintain Good Ground Connection
A solid ground connection improves amplifier performance. Loose or rusty grounds cause noise and signal loss. Connect the ground wire to clean, bare metal on the vehicle or chassis. Keep the ground wire short and secure. A good ground reduces electrical interference and protects against power surges.
Avoid Overheating
Heat is a major enemy of amplifiers. Overheating causes shutdowns and long-term damage. Install the amplifier in a well-ventilated area with good airflow. Do not block cooling vents or cover the amp with objects. Use fans or heat sinks if necessary to keep temperatures low. Regularly check for dust buildup that can block airflow.

Credit: www.youtube.com
Frequently Asked Questions
How To Get An Amp Out Of Protection Mode?
Power off the amp and wait. Check ventilation and wiring for shorts or loose connections. Disconnect speakers and inputs, then power on. Test speakers individually to find faults. Verify correct gain and impedance settings. If it stays in protect mode, seek professional repair for internal damage.
How Do I Tell If My Amplifier Is Blown?
Check for no sound, distorted audio, or the amplifier not powering on. Inspect fuses, wiring, and speaker connections. Overheating or constant protect mode also indicate a blown amp.
How To Hard Reset Hard Reset?
To hard reset, power off the device, unplug it, wait 30 seconds, then press and hold the reset button. Release and power on.
What Is The Most Common Amplifier Failure?
The most common amplifier failure is overheating, which often causes the amp to enter protect mode and shut down.
How Do I Reset My Amplifier To Factory Settings?
Press and hold the reset button or follow the manual’s reset steps for your model.
Conclusion
Resetting your amplifier can solve many common issues fast. Always check wiring, fuses, and speaker connections carefully. Keep the amplifier cool and well-ventilated during use. Testing components step-by-step helps find the exact problem. If problems continue, the amp might need professional repair.
Following these simple steps can extend your amplifier’s life. Stay patient and methodical for the best results.