If you’ve noticed your brakes acting a little off or your vehicle pulling during stops, your brake proportioning valve might need a reset. This small but crucial component balances the pressure between your front and rear brakes, ensuring smooth and safe braking every time you hit the pedal.
But how exactly do you reset it? Don’t worry—you’re in the right place. You’ll discover simple, step-by-step instructions to adjust your brake proportioning valve correctly. By following these easy tips, you’ll improve your braking performance and drive with confidence again.
Ready to get started? Let’s dive in.

Credit: www.speedwaymotors.com
Safety Precautions
Ensure the vehicle is parked on a flat surface with wheels blocked before starting. Always wear gloves and eye protection to avoid injury. Avoid working near hot components or moving parts during the brake valve reset.
Park On Level Ground
Choose a flat and stable spot to work on your brakes. A level surface prevents the vehicle from rolling. It also helps keep brake fluid levels steady during adjustment. Safety improves when the car stays still.
Engage Parking Brake
Always set the parking brake before starting. This locks the rear wheels firmly in place. It reduces the chance of the vehicle moving unexpectedly. The parking brake adds an extra layer of safety.
Block The Wheels
Place wheel chocks or blocks in front and behind the wheels. This stops the car from rolling forward or backward. Use sturdy objects designed for this purpose. Blocking wheels is a simple but crucial step.
Identify Your Valve
Before resetting your brake proportioning valve, you must first identify the type of valve you have. Different valves need different handling methods. Knowing your valve type helps avoid mistakes during adjustment. It also ensures safety and correct brake performance.
Screw-type Valve
The screw-type valve has a small knob or screw. It usually sits on the brake line near the rear brakes. You turn this knob to adjust the brake pressure. Clockwise often increases pressure, and counter-clockwise lowers it. Check your vehicle manual to confirm the direction.
This type is common on many trucks and older vehicles. It allows fine-tuning of rear brake pressure. Turning the screw reduces or increases force sent to the rear brakes. This helps balance braking power between front and rear wheels.
Lever-type Valve
The lever-type valve uses a small lever or arm instead of a screw. It looks like a tiny handle attached to the valve body. Moving the lever changes the pressure level. Usually, pushing the lever down lowers rear brake pressure.
This valve type is often found on older cars or some custom brake systems. It gives a quick way to adjust brake bias. The lever moves in steps or clicks to set the desired pressure. Make sure the lever is secure after adjustment.
Set Your Brake Bias Goal
Setting your brake bias goal is key before resetting the proportioning valve. Brake bias means how much force the front and rear brakes get. The right balance keeps your car stable and safe while braking.
Adjusting the valve changes this balance. It shifts the brake pressure between the front and rear wheels. The goal is to avoid wheel lockup and maintain control. Knowing your brake bias target makes adjustments easier and safer.
Front Brakes Lock Before Rear
It is important that the front brakes lock just before the rear ones. This order helps keep the car stable during sudden stops. If the rear brakes lock first, the car may spin or slide.
To achieve this, reduce the rear brake pressure slightly using the proportioning valve. Test the brakes carefully after each adjustment. Watch for the front wheels locking first under hard braking.
Prevent Rear Wheel Lockup
Rear wheel lockup is dangerous. It causes the back of the car to lose grip and slide. This happens when rear brake pressure is too high.
Adjust the valve to lower rear brake pressure. Turn the knob or lever step by step. Test the brakes on a safe road or empty parking lot. Stop adjusting once the rear wheels stay steady without locking.
Setting your brake bias right helps you stop safely and keep control. Take your time. Make small changes. Test often.
Credit: www.speedwaymotors.com
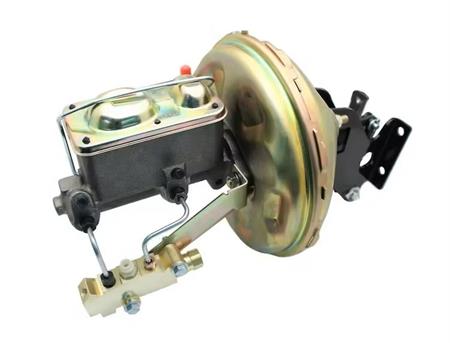
Remove Factory Valve
Removing the factory brake proportioning valve is the first step to reset or replace it. This valve controls brake pressure between front and rear brakes. Removing it carefully prevents damage to brake lines and ensures safety. Follow these steps to remove the factory valve properly.
Locate Stock Valve
Locate the stock valve under the vehicle or in the engine bay. It usually sits on the rear brake line near the master cylinder. Look for a small metal block with brake lines attached. Use a flashlight for better visibility. Confirm the valve by tracing the brake lines from the master cylinder.
Detach Carefully
Before detaching, clean the valve area to avoid dirt entering the brake system. Use a wrench to loosen the brake line fittings gently. Do not force or twist too hard to avoid breaking the lines. Have a container ready to catch brake fluid. Remove the valve slowly and keep brake lines supported to prevent strain.
Adjusting Screw-type Valve
The adjusting screw-type valve controls brake pressure between front and rear brakes. It helps balance braking force for safe stopping. Adjusting this valve is simple and effective. Follow steps carefully to get the best brake performance.
Locate Adjustment Knob
Find the screw-type valve on the rear brake line. Look near the brake proportioning valve or master cylinder. The knob usually sticks out and is easy to turn by hand.
Turn Knob To Change Pressure
Turn the knob clockwise to increase rear brake pressure. Turn it counterclockwise to reduce pressure. Start with small turns, about a quarter turn at a time, to avoid over-adjusting.
Test Braking Response
Drive slowly in a safe area. Press the brake pedal hard and feel how the brakes react. Notice if the rear brakes lock too early or if the front brakes stop the car first.
Fine-tune In Small Steps
Adjust the knob in small steps based on your test results. Make tiny turns and test again. This helps reach the right balance without causing brake lock or instability.
Achieve Optimal Brake Balance
Your goal is front brakes locking just before the rear brakes. This balance keeps the vehicle stable and shortens stopping distance. Keep adjusting until you feel a smooth, safe braking action.
Adjusting Lever-type Valve
The lever-type brake proportioning valve controls brake pressure to the rear wheels. Adjusting this valve helps balance braking force between front and rear brakes. Proper adjustment improves vehicle stability and stopping power.
Follow these clear steps to adjust the lever-type valve safely and effectively. Small changes make a big difference in brake performance.
Identify Lever Position
First, find the lever on the proportioning valve. It usually sits on the valve body or nearby.
Check the current position of the lever. It may have markings or stops showing pressure levels.
Understanding the starting point helps guide the adjustment process.
Move Lever To Adjust Pressure
Move the lever slowly to change brake pressure to the rear wheels.
Moving the lever toward less pressure reduces rear brake force. Toward more pressure increases it.
Make small moves and note the direction to avoid over-adjusting.
Test Brake Performance
After adjusting, test the brakes carefully in a safe, open area.
Brake hard and observe wheel lockup. The front wheels should lock slightly before the rear ones.
Proper brake balance prevents rear wheel lock and improves control.
Make Incremental Changes
Adjust the lever in small steps. Test after each change.
Repeated tests ensure the best pressure balance without risking safety.
Stop adjusting once the rear brakes apply smoothly without locking up prematurely.
Bleeding The Brake System
Bleeding the brake system is essential after resetting the brake proportioning valve. This process removes air trapped in the brake lines. Air pockets can cause a spongy brake pedal and reduce braking efficiency. Proper bleeding ensures the brake fluid flows smoothly and the brakes respond correctly.
Follow these steps carefully to bleed your brake system and restore optimal brake performance.
Turn Valve Fully Clockwise
Start by turning the proportioning valve fully clockwise. This setting closes the valve and stops fluid flow to the rear brakes. It helps isolate the rear brake lines during bleeding. Turning the valve fully clockwise prepares the system for a proper bleed.
Bleed Brakes
Next, bleed the brakes starting from the wheel farthest from the master cylinder. Usually, this is the right rear wheel. Use a clear hose and container to catch the fluid. Pump the brake pedal slowly and hold it down. Open the bleeder valve to release air and old fluid. Close the valve before releasing the pedal. Repeat until clear fluid flows without bubbles.
Move to the next farthest wheel and repeat the bleeding steps. Continue until all wheels have no air in the brake lines. Check the brake fluid level in the master cylinder regularly and refill if needed.
Return Valve To Previous Setting
After bleeding, return the proportioning valve to its previous setting. Turn the valve counterclockwise to the original position. This restores the proper brake pressure balance between front and rear brakes. Test the brake pedal for firmness and responsiveness. Proper valve adjustment and bleeding improve vehicle safety and brake control.
Using Pressure Gauges
Using pressure gauges is a precise way to reset your brake proportioning valve. These gauges measure hydraulic pressure in the brake lines. Accurate readings help balance front and rear brake forces. This balance improves vehicle safety and brake performance. Follow these steps to use pressure gauges effectively during the reset process.
Monitor Front Line Pressure
Attach a pressure gauge to the front brake line. Start the vehicle and apply the brakes gently. Note the pressure reading on the gauge. This value shows the force sent to the front brakes. Keep this reading steady during adjustments. It acts as a reference point for balancing brake pressure.
Monitor Rear Line Pressure
Next, connect a pressure gauge to the rear brake line. Apply the brakes with the same force as for the front line. Record the pressure shown on this gauge. Rear line pressure should be lower than front pressure. This prevents rear wheel lockup during braking. Continuous monitoring is key to safe adjustments.
Adjust For Balanced Readings
Turn the proportioning valve adjustment knob slowly. Watch the rear pressure gauge as you make changes. Aim for a pressure that is slightly lower than the front line. Check brake pedal feel after each adjustment. Stop when front brakes lock slightly before the rear. This setting ensures stable and effective braking.
Common Issues And Fixes
Brake proportioning valves help balance brake pressure between front and rear wheels. Problems with these valves can cause unsafe braking. Identifying common issues helps fix them quickly. Here are typical problems and easy fixes for your brake system.
Rear Brakes Lock Too Early
Rear brakes that lock early cause skidding and loss of control. This often happens if the valve sends too much pressure to the rear brakes. To fix this, reduce rear brake pressure by turning the valve’s adjustment knob or lever toward less pressure. Test the brakes on a safe road after each adjustment. Adjust slowly until the rear brakes lock just after the front brakes.
Rear Brakes Too Weak
Weak rear brakes increase stopping distance and stress the front brakes. This problem happens if the valve restricts rear brake pressure too much. Increase pressure by turning the adjustment knob or lever toward more pressure. Test carefully after each change. Make sure the rear brakes engage firmly but do not lock before the front brakes.
Uneven Brake Response
Uneven brake response feels like one side braking harder than the other. It can cause pulling or shaking during stops. This problem may come from a stuck valve or air in the brake lines. First, bleed the brakes to remove air. Check the valve for dirt or corrosion. Clean or replace the valve if needed. After, adjust the valve to balance brake pressure evenly.
Maintenance Tips
Proper maintenance of the brake proportioning valve ensures safe and balanced braking. Regular care prevents uneven brake wear and improves vehicle control. Follow these simple tips to keep the valve in good working order.
Regular Inspection
Check the valve and brake lines often. Look for leaks, cracks, or rust. Early detection helps avoid bigger problems. Inspect connections for tightness and corrosion. Pay attention to any unusual brake behavior.
Clean Valve Components
Dirt and grime can block the valve. Use a clean cloth to wipe the valve exterior. Avoid harsh chemicals that might damage seals. Clean surrounding areas to prevent dirt from entering the system. A clean valve works more efficiently.
Replace Worn Parts
Old or damaged parts reduce valve performance. Replace seals, springs, or the entire valve if needed. Use parts that match your vehicle specifications. Timely replacement maintains brake balance and safety. Never ignore worn components.

Credit: www.youtube.com
Frequently Asked Questions
How Do You Adjust A Proportional Valve?
Adjust a proportional valve by turning its knob or lever to reduce rear brake pressure. Test brakes carefully. Adjust until front brakes lock just before the rear. Follow manufacturer instructions for exact settings and ensure proper valve installation.
How To Tell If A Proportioning Valve Is Bad?
A bad proportioning valve causes uneven brake pressure, rear brakes locking early, or brake fluid leaks. Check for spongy pedal feel or poor braking performance.
How To Get Trapped Air Out Of A Brake System?
To remove trapped air from brakes, bleed the system by opening bleeder valves and pumping the brake pedal. Repeat until no air bubbles appear. Ensure the brake fluid reservoir stays full during the process to prevent new air entry. This restores proper brake pressure and responsiveness.
How To Reset Brake Position Sensor?
To reset a brake position sensor, turn the ignition on without starting. Press and hold the brake pedal fully for about 10 seconds. Release and then press the brake pedal three times quickly. Turn off the ignition to complete the reset.
What Is A Brake Proportioning Valve Reset?
A reset adjusts brake pressure between front and rear brakes for safer braking.
Conclusion
Resetting the brake proportioning valve improves your vehicle’s braking balance. Adjust the valve step-by-step and test carefully after each change. Always aim for the front brakes to lock just before the rear brakes. This method keeps your driving safer and prevents brake issues.
Take your time, follow instructions, and stay safe during the process. With patience, you can maintain better control and braking performance on the road.