Is your garage door opener acting up or have you just moved into a new home? Knowing how to reset your garage opener can save you time, money, and frustration.
Whether you need to reprogram remotes, clear old codes, or restore factory settings, this simple guide will walk you through each step with clear instructions. You’ll feel confident handling your garage opener like a pro in no time. Keep reading to unlock the easy secrets to resetting your garage opener quickly and securely.
Locate The Learn Button
Locating the Learn button is the first step to reset your garage door opener. This button helps you clear old codes and add new remotes. It is usually on the main unit of the garage door opener. Knowing its exact position saves time and makes the reset process easier.
The Learn button controls the programming mode. Pressing it allows the opener to accept new remotes or keypads. It often lights up or blinks to show it is active. This button is small but essential for resetting or programming your device.
Find The Button On Opener Unit
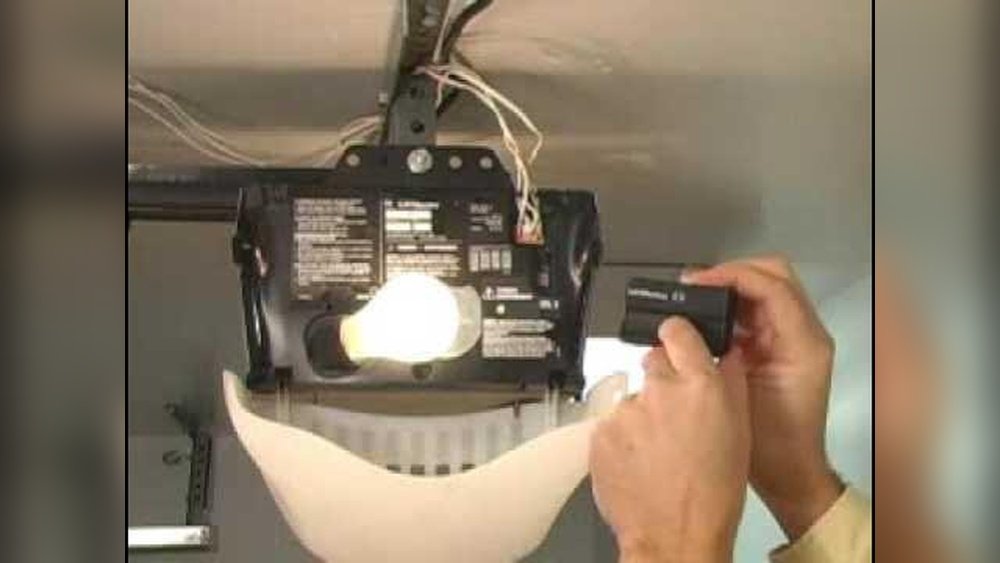
The Learn button is on the garage door opener motor unit. This unit is typically mounted on the ceiling of your garage. Look at the back or side of this box. It may be near the antenna wire or near the light cover.
Use a flashlight if the space is dark. The button is small, about the size of a pea. It may be labeled “Learn” or “Smart.” If you cannot find any label, look for a small round or square button.
Identify Button Color And Position
The Learn button often comes in bright colors. Common colors include red, yellow, purple, or green. These colors stand out against the opener unit’s metal or plastic surface. Knowing the color helps you spot it quickly.
The position of the button varies by brand. It may be near the antenna wire or close to the light bulb cover. Sometimes it is behind a small panel or under a plastic cover. Check your opener’s manual if you struggle to find it.
Activate Learn Mode
Activating the learn mode is a key step in resetting your garage door opener. This mode allows the opener to recognize new remote controls or keypads. It prepares the system to accept fresh signals by clearing old codes.
Entering learn mode is simple and fast. It involves pressing a specific button on the motor unit. Watching the indicator light helps confirm that the system is ready to pair with your device.
Press The Learn Button
Locate the learn button on your garage door opener motor. It is often red, yellow, or purple. Press and hold this button for about 6 seconds until the indicator light turns on. This action puts the opener into learn mode.
After releasing the button, you usually have 30 seconds to activate your remote or keypad. The opener waits for the new device’s signal during this time.
Watch For Indicator Light
Observe the indicator light on the opener unit carefully. It may glow steady or blink slowly when in learn mode. This light confirms the opener is ready to accept a new remote or keypad signal.
Once you press a button on your remote, the light will flash quickly or turn off. This shows the new code has been learned and saved by the opener system.
Program The Remote
Programming the remote is key to controlling your garage door opener. It links your remote with the opener’s receiver. Without this step, the remote cannot operate the door. The process is simple and quick. Follow these steps carefully to program your remote successfully.
Press Remote Button Quickly
Start by pressing the “Learn” button on your garage opener. This button is usually red, yellow, or purple. The opener’s light will turn on or blink. Within 30 seconds, press the button on your remote quickly. This action sends a signal to the opener.
Press the remote button firmly but do not hold it too long. A short press is enough to register the code. Timing is important here. Pressing too late or too long may cause the programming to fail.
Confirm With Light Flash Or Clicks
After pressing the remote button, watch the opener’s light or listen closely. A flashing light or two clicks from the motor unit means the remote is programmed. This confirmation shows your remote and opener are paired.
If no light flash or sound occurs, repeat the steps. Make sure you press the remote button quickly after pressing “Learn.” The confirmation is your sign to test the remote by opening or closing the door.
Test The Remote
Testing the remote is a key step after resetting your garage door opener. It ensures the remote pairs correctly with the opener. This quick check saves time and confirms the reset worked. Follow simple steps to test your remote effectively.
Press Programmed Button
Start by pressing the button you programmed on your remote. Hold it for a few seconds. The garage door opener should respond to this command. If it does not, try pressing the button again. Make sure you are within range of the opener unit. A weak signal can cause no response.
Check Door Response
Observe the garage door’s movement closely. It should open or close smoothly after pressing the remote button. If the door does not move, check the batteries in your remote. Also, verify the remote is correctly programmed. Repeat the programming steps if needed. Confirm the door responds every time you press the remote.
Reset Older Openers
Resetting older garage door openers requires a different approach than modern models. These openers use dip switches to set the remote control codes. Resetting involves carefully adjusting these tiny switches to match between the remote and the opener. This process restores communication and allows the garage door to respond to your remote again.
Locate Dip Switches
First, find the dip switches inside the garage door opener and remote control. Open the remote by sliding off its cover or removing screws. The dip switches appear as small rows of switches, usually numbered. Open the motor unit cover to reveal its dip switches, often near the antenna wire.
Match Switch Patterns On Remote
Check the pattern of ON and OFF positions on the motor unit switches. Adjust the remote’s dip switches to match the exact same pattern. Use a small tool or your fingernail to flip the switches up or down. Matching these patterns tells the opener to accept signals from your remote again.
Secure The Switch Cover
After matching the switches, replace the remote cover securely. Make sure it snaps or screws back into place firmly. This protects the dip switches from dust and accidental changes. Test the remote by pressing its button to ensure the garage door responds correctly.
Erase All Codes
Erasing all codes from your garage door opener clears all programmed remotes and keypads. This step is crucial for security and troubleshooting. Removing old codes prevents unauthorized access and lets you start fresh. Follow simple steps to erase codes safely and effectively.
Access Control Panel
Find the control panel on your garage door opener motor. It is usually on the ceiling near the garage door. Look for a small box with buttons and lights. This panel holds the reset button and programming features.
Press And Hold Reset Button
Locate the reset button on the control panel. It may be labeled “Reset,” “Learn,” or “Program.” Press and hold this button for about 10 seconds. Keep holding until the indicator light turns off or blinks differently.
Wait For Confirmation Signals
Release the reset button after holding it. Watch for the control panel’s light to blink or turn off. This signal confirms all codes are erased. Your garage door opener is now cleared of all previous settings.
Reprogram Multiple Remotes
Reprogramming multiple remotes for your garage door opener keeps all devices working smoothly. This process ensures each remote controls the door without conflicts. Programming several remotes at once saves time and effort. Follow clear steps to avoid errors and ensure reliable operation.
Repeat Programming Steps
Start by pressing the “Learn” button on the garage opener. The light will turn on, signaling readiness. Quickly press the button on the first remote. Wait for the opener’s light to flash or hear two clicks. This confirms the remote is programmed.
Repeat the same steps for each additional remote. Press the “Learn” button again before programming the next remote. Always act quickly after pressing “Learn” to avoid timing out. Completing this process for all remotes pairs them with the opener.
Test Each Remote Individually
After programming, test each remote separately. Press the remote button to open or close the garage door. Check for a quick response with no delays. If a remote doesn’t work, repeat its programming steps.
Testing ensures every remote sends the correct signal. It prevents confusion and saves time later. Confirm all remotes control the door reliably before finishing. This step guarantees safe and smooth garage door operation.

Adjust Limit Settings
Adjusting the limit settings on your garage door opener controls how far the door moves when opening or closing. Proper limits ensure the door stops at the right positions. This prevents damage and keeps the door working smoothly.
Limit settings are usually adjusted using screws on the opener unit. These screws set the door’s open and close points. Small changes can make a big difference in door operation. Follow these steps carefully to adjust the limits correctly.
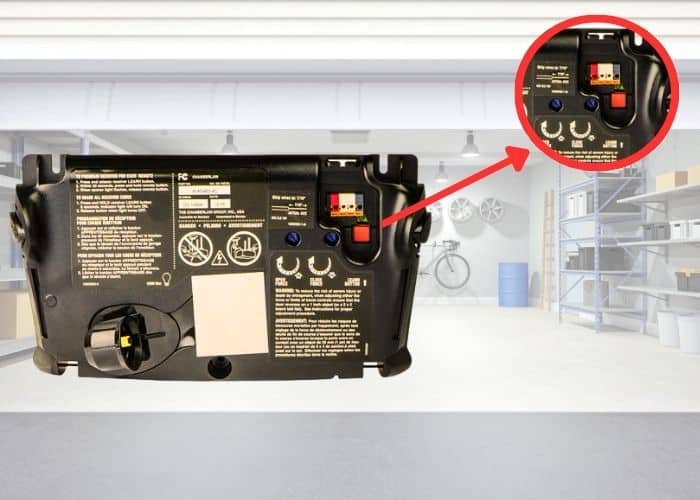
Locate Limit Adjustment Screws
First, find the limit adjustment screws on your garage door opener. They are often near the motor or on the side of the unit. Look for two small screws marked “Up” and “Down” or “Open” and “Close.” These control the door’s travel limits.
Use a flashlight if needed. The screws may be small and hard to spot. Check your opener’s manual for exact screw locations. Avoid forcing anything to prevent damage.
Turn Screws To Set Open/close Limits
Turn the screws slowly to adjust the door limits. One screw controls how far the door opens. The other controls how far it closes. Turn clockwise to increase the travel distance. Turn counterclockwise to decrease it.
Make small adjustments, about a quarter turn at a time. This helps avoid over-adjusting. Remember, the goal is to set the door to fully open and fully close without hitting or stopping too early.
Test Door Movement
After adjusting the screws, test the door’s movement. Use the remote or wall switch to open and close the door. Watch the door carefully. It should stop at the desired open and closed positions.
If the door does not stop correctly, adjust the screws again. Repeat testing until the door moves smoothly and stops correctly. Proper limits keep your garage door safe and reliable.
Disengage And Reengage Opener
Disengaging and reengaging your garage door opener is a key step in resetting it. This process allows you to manually control the door and ensures the opener is properly synced. Follow these simple steps to safely disconnect and reconnect your opener.
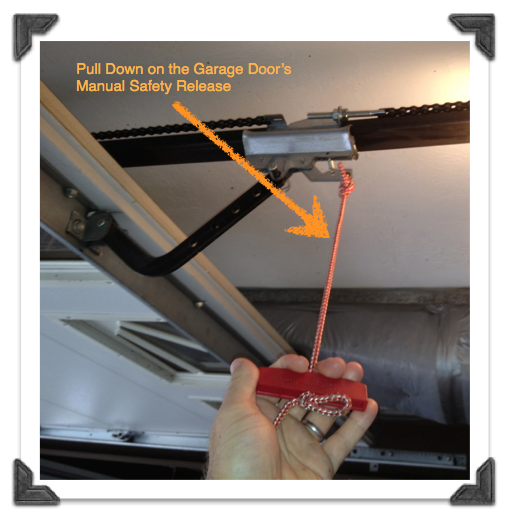
Pull Emergency Release Cord
Locate the emergency release cord hanging from the opener trolley. It usually has a red handle for easy identification. Pull this cord straight down to disconnect the door from the opener. This action allows you to move the door manually without resistance from the motor.
Manually Move Door
After pulling the release cord, gently lift or lower the garage door by hand. Check that the door moves smoothly along its tracks. This step helps to reset the door’s position and clear any obstructions. Avoid forcing the door to prevent damage to the mechanism.
Reattach Opener Hook
To reconnect the opener, pull the emergency release cord towards the door or lift the trolley until it clicks back into place. Ensure the opener hook securely engages with the door arm. Test the opener by pressing the remote or wall switch to confirm it operates correctly.
Troubleshoot Common Issues
Troubleshooting common issues helps fix your garage opener quickly. Many problems arise from simple causes. Checking these areas first saves time and effort. Follow the steps below to identify and solve basic problems.
Check Power Supply
Ensure your garage opener is plugged in securely. Look for any loose cords or damaged wires. Check the circuit breaker or fuse box for tripped switches. Power interruptions often cause the opener to stop working. Restoring power may solve the problem instantly.
Inspect Remote Batteries
Weak or dead batteries often cause remote failures. Open the battery compartment and replace old batteries with fresh ones. Use the correct battery type as listed in your manual. Test the remote after replacing batteries to see if it works properly. Keep spare batteries handy for quick replacements.
Verify Signal Range
Distance affects the remote’s signal strength. Stand closer to the garage door opener and try again. Walls, metal objects, and electronic devices can block signals. Remove obstacles if possible or adjust your position. If the signal remains weak, the remote or opener antenna may need inspection.
Frequently Asked Questions
How To Reprogram Garage Door Remote Opener?
Press the “Learn” button on the opener until the light glows. Then, press your remote button until lights flash or you hear clicks. For older models, match dip switch patterns on remote and opener. Test the remote to confirm programming.
How Do You Reset Your Liftmaster Garage Door Opener?
Press and hold the “Learn” button on the LiftMaster opener until the LED lights up. Release it to erase all codes and reset. Reprogram remotes by pressing “Learn” and then the remote button until lights flash.
How To Reset Electric Roller Garage Door?
To reset an electric roller garage door, locate the opener’s reset or learn button. Press and hold it until the indicator light blinks. Release the button, then press your remote’s button to sync. Test the door to ensure proper reset and operation.
How Do I Clear The Garage Door Opener’s Memory?
Press and hold the “Learn” button on the opener until its indicator light turns off. This clears all programmed remotes and keypads.
How Do I Reset My Garage Door Opener Remote?
Press the “Learn” button on the opener until the light glows. Then press your remote button until lights flash.
Conclusion
Resetting your garage door opener is simple and saves time. Start by locating the learn button on your motor unit. Follow the steps carefully to erase old codes and add new remotes. Testing the remote ensures the process worked correctly.
Regularly resetting improves security and device performance. Keep your instructions handy for future reference. Taking control of your garage opener keeps your home safe and convenient.