Is your HoMedics air purifier showing a blinking light or not working as smoothly as before? You might need to reset it to keep your indoor air fresh and clean.
Resetting your HoMedics air purifier is easier than you think, and doing it right can improve its performance instantly. Whether you’ve just changed the filter or your purifier is acting up, this simple step can save you time and hassle.
In this guide, you’ll learn exactly how to reset your HoMedics air purifier quickly and effectively—so you can breathe easier without any interruptions. Keep reading to discover the step-by-step process that anyone can follow.

Credit: airpurifiersadvisor.com
Locate Reset Button
Finding the reset button on your HoMedics air purifier is the first step to restoring its normal function. This button helps clear filter alerts and other error signals. The reset button location varies by model, but it is usually easy to find. Knowing where to look saves time and frustration during the reset process.
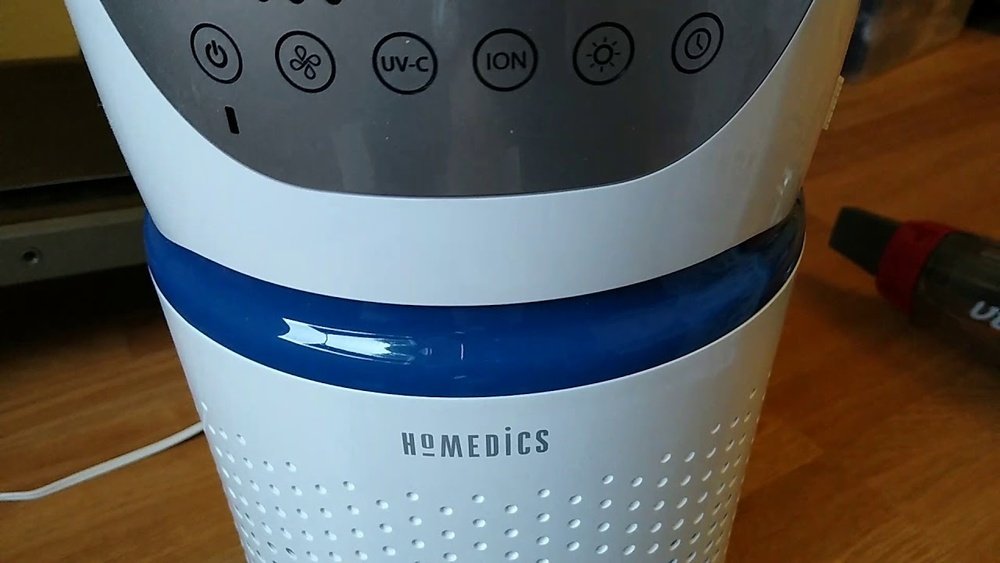
Control Panel Reset Options
Many HoMedics air purifiers have a reset button on the control panel. This button might say “Reset,” “Filter Reset,” or show a small reset symbol. It often shares space with other function buttons. Check around the display or near the power button. Press and hold this button for a few seconds to reset the device.
Side And Back Reset Buttons
Some models place the reset button on the side or back of the unit. Look for a small, recessed button that may require a paperclip or pin to press. This design prevents accidental resets. Inspect the edges and rear panel carefully. Pressing this button resets the filter indicator and clears error codes.
Reset After Filter Replacement
Resetting your HoMedics air purifier after changing the filter is important. It clears the filter indicator light. This helps the purifier track filter life correctly.
The reset process is simple. It starts by removing the old filter and inserting a new one. Then, you press the filter reset button. Follow these steps carefully for best results.
Remove And Insert New Filter
Turn off the air purifier and unplug it. Open the front cover to access the filter. Gently remove the old filter from its slot.
Take the new filter out of its packaging. Insert the new filter firmly into the slot. Close the front cover securely to avoid air leaks.
Press Filter Reset Button
Plug in the air purifier and turn it on. Locate the filter reset button on the control panel. It usually says “Reset” or “Filter Reset.”
Press and hold the reset button for about 3 seconds. The filter light will turn off or blink briefly. This confirms the reset is complete.
Your HoMedics air purifier is now ready to use with the new filter.
Power Cycle Reset
The power cycle reset is a simple and effective way to fix many issues with your Homedics air purifier. It helps clear minor glitches and refreshes the system. This process involves turning off the device completely, unplugging it, and then restarting it. Power cycling can restore normal function without complicated steps.
Unplugging The Unit
Start by turning off your Homedics air purifier. Locate the power cord at the back of the unit. Gently unplug the cord from the electrical outlet. Leave the unit unplugged for about 1 to 2 minutes. This pause allows the internal components to reset. Do not skip this waiting time, as it ensures a full reset.
Restarting The Air Purifier
After waiting, plug the power cord back into the outlet. Press the power button to turn the air purifier back on. Watch for normal startup lights and sounds. The unit should now operate as usual. If the problem remains, consider repeating the power cycle once more. This reset method often resolves common issues quickly and easily.

Credit: www.manuals.co.uk
Check Filter Installation
Checking the filter installation is an important step in resetting your Homedics air purifier. A poorly installed filter can cause the purifier to show error lights or not work properly. It is essential to verify that the filter matches your model and is placed correctly inside the unit. This helps the purifier run smoothly and keeps your air clean.
Compatible Filter Models
Use only filters that fit your Homedics air purifier model. Each model requires specific filter types. Check the user manual or the product label for the correct filter code. Using the wrong filter can cause errors and reduce air cleaning efficiency. Buy genuine or certified replacement filters for best results.
Proper Filter Seating
Ensure the filter fits snugly inside the purifier. Remove the filter cover and place the filter in its slot firmly. The filter should not move or wiggle once seated. Close the cover tightly to avoid gaps. Incorrect seating can block airflow and trigger warning lights. A secure fit helps the purifier work at full capacity.
Clean Air Quality Sensor
The clean air quality sensor plays a key role in your Homedics air purifier. It detects the air’s condition and adjusts the purifier’s work. Over time, dust and dirt can cover the sensor. This buildup may cause wrong readings or stop the sensor from working well. Cleaning the sensor helps keep your purifier running smoothly. It also ensures the air you breathe stays fresh and healthy.
Locate Sensor Area
Find the air quality sensor on your Homedics purifier. Usually, it is near the air intake or on the side panel. Check your user manual for the exact location. The sensor looks like a small square or circle with tiny holes. Make sure the purifier is off before you touch the sensor area. This step keeps you safe and avoids damage to the device.
Use Soft Cloth For Cleaning
Use a dry, soft cloth to clean the sensor gently. Avoid using water or any liquid cleaners. Lightly wipe the sensor surface to remove dust and dirt. Do not press hard or scratch the sensor. After cleaning, wait a few minutes before turning the purifier back on. Regular cleaning helps the sensor detect air quality correctly. It also extends the life of your air purifier.
Troubleshoot Persistent Red Light
The persistent red light on your HoMedics air purifier signals an issue needing your attention. This light often means the filter requires replacement or the device needs resetting. Ignoring this can reduce air purifier efficiency.
Follow simple steps to troubleshoot and reset the red light. Try manual methods first. If these fail, use other resources to solve the problem.
Manual Reset With Paperclip
Some HoMedics models have a small reset hole. Use a paperclip to press this button gently. Hold it for about 5 seconds. This action resets the filter indicator light. Make sure the air purifier is on before you try this.
Do not force the paperclip inside. Be gentle to avoid damage. If this does not work, try other methods below.
Consult User Manual
The user manual is a key resource. It provides model-specific instructions. Locate the reset process section. Follow the steps exactly as described.
Look for troubleshooting tips related to the red light. Sometimes, sensor cleaning or filter reinstallation is necessary. Manuals also list error codes and their meanings.
Contact Customer Support
If the red light persists, contact HoMedics customer support. Explain the issue and steps already taken. They can guide you through advanced troubleshooting or repairs.
Customer support can confirm if a sensor or internal part needs replacement. They may also provide warranty service if applicable. Keep your purchase details handy for faster help.

Credit: www.manua.ls
Frequently Asked Questions
Where Is The Reset Button On My Air Purifier?
The reset button is usually on the control panel, labeled “Reset” or “Filter Reset. ” Some models place it on the side or back. Press and hold the button to reset the filter indicator light. Check your user manual for exact location and instructions.
How Do You Reset Homedics Clean?
To reset a HoMedics air purifier, press and hold the reset button on the control panel for 3-5 seconds. Release it when the indicator light changes. This clears the filter alert and restarts the device. Ensure the new filter is properly installed before resetting.
Why Is My Air Purifier Still Blinking Red After Replacing The Filter?
Your air purifier blinks red after filter replacement because you must manually reset the filter indicator light. Check filter installation and clean the sensor. Press and hold the reset button or power cycle the unit. Refer to the manual or contact support if the light persists.
How Do You Set The Homedics Air Purifier?
To set the HoMedics air purifier, insert the correct filter and close the unit. Press and hold the reset button until the indicator light stops blinking. Turn on the purifier and select your desired fan speed using the control panel.
How Do I Reset My Homedics Air Purifier Filter Indicator?
Press and hold the “Filter Reset” button for 3 seconds until the light stops blinking.
Conclusion
Resetting your HoMedics air purifier keeps it working well and clean. Always follow the steps carefully to avoid mistakes. A proper reset clears filter alerts and improves air quality. Regular resets help the machine run longer and more efficiently. Keep your air fresh and healthy by resetting when needed.
Simple actions make a big difference in your home environment. Stay comfortable and breathe easier with a well-maintained purifier.