Is your car’s check engine light on, and you suspect a knock sensor issue? Knowing how to reset knock sensors can save you time, money, and unnecessary trips to the mechanic.
Your knock sensor plays a crucial role in keeping your engine running smoothly by detecting unwanted vibrations or “knocks” that can damage your engine. When it malfunctions, your car’s performance suffers, and the warning light won’t stop flashing. In this guide, you’ll learn simple, step-by-step methods to reset your knock sensors effectively—whether by using a scanner or a quick battery disconnect.
Keep reading to take control of your vehicle’s health and get back on the road with confidence.

Credit: www.toyotanation.com
Knock Sensor Basics
The knock sensor is a small but vital part of your vehicle’s engine system. It helps detect engine knocking, which can cause serious damage. Understanding the basics of this sensor is key to knowing how to reset it properly.
Knock sensors work quietly in the background to keep your engine running smoothly. They sense vibrations and send signals to the engine control unit (ECU). This allows the ECU to adjust timing and prevent knocking.
Function And Importance
The knock sensor detects unusual vibrations caused by engine knocking. Knocking happens when fuel burns unevenly in the cylinder. This can damage engine parts over time.
The sensor sends signals to the ECU, which changes the ignition timing. This reduces knocking and protects the engine. Without a working knock sensor, the engine may lose power and efficiency.
Proper function of the knock sensor helps improve fuel economy and reduces harmful emissions. It plays a key role in maintaining overall engine health.
Common Symptoms Of Failure
A faulty knock sensor causes the engine to run poorly. You may notice a loss of power or rough idling. The check engine light often turns on.
Other signs include poor fuel economy and increased exhaust emissions. Engine knocking noises may become louder or more frequent. These symptoms suggest the sensor needs inspection or replacement.
Ignoring a bad knock sensor can lead to costly engine repairs. Early detection helps maintain vehicle performance and safety.

Credit: www.youtube.com
Tools Needed
Resetting knock sensors requires specific tools to diagnose and fix the issue accurately. Having the right tools saves time and avoids unnecessary repairs. This section covers the essential tools needed for a successful reset.
Obd-ii Scanner
An OBD-II scanner reads the car’s error codes from the engine control unit. It helps identify if the knock sensor is faulty. This tool also clears the error codes after resetting the sensor. Most modern cars have an OBD-II port under the dashboard. The scanner connects easily and provides instant feedback.
Basic Hand Tools
Basic hand tools are necessary to access and remove the knock sensor. A socket set, ratchet, and screwdrivers often do the job. These tools help loosen bolts and disconnect sensor connectors safely. Always use the correct size to avoid damaging parts. Having a magnetic tray can keep bolts from getting lost.
Multimeter For Testing
A multimeter measures electrical signals from the knock sensor. It checks the sensor’s resistance and voltage output. This confirms if the sensor is working properly before and after resetting. Set the multimeter to the correct setting for accurate readings. Using a multimeter avoids replacing sensors unnecessarily.
Preparation Steps
Preparation is key before resetting knock sensors. Taking the right steps ensures safety and prevents damage. Follow these simple actions to get ready for the reset process.
Park And Power Down
Find a flat, safe spot to park your vehicle. Turn off the engine completely. Remove the key from the ignition. Let the car sit for a few minutes. This helps the system power down fully. Avoid touching any electrical parts while the car is running.
Disconnecting The Battery
Locate the car battery under the hood. Identify the negative terminal, usually marked with a minus (-) sign and black color. Use a wrench to loosen the negative terminal clamp. Carefully remove the cable from the battery post. This stops electrical flow and protects you from shocks. Keep the cable away from the battery to avoid accidental contact.
Locating The Knock Sensor
Finding the knock sensor is the first step in resetting it properly. The sensor is usually mounted on the engine block, cylinder head, or intake manifold. Its location depends on the car make and model. Knowing where to find it helps avoid unnecessary work and damage. This section guides you through common sensor locations and how to clear the path to access it.
Common Sensor Locations
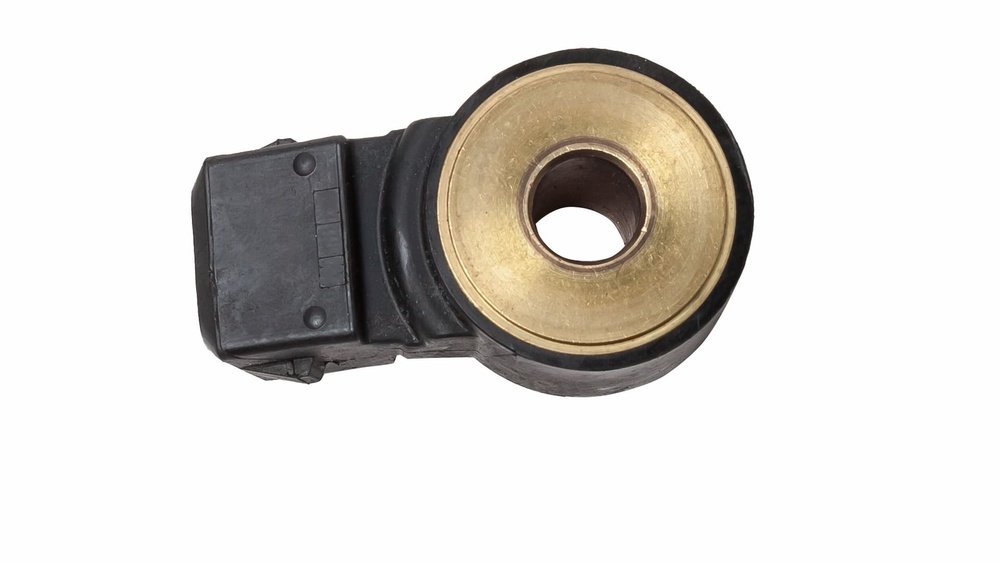
Most knock sensors sit on the engine block near the cylinders. Sometimes they are under the intake manifold or on the cylinder head. Some cars have one sensor, others have two or more. The sensor looks like a small round or oval device with a wire connector. Checking the vehicle manual can narrow down the exact spot quickly.
Removing Obstructions
Parts like the intake manifold or air intake tubes often block access to the knock sensor. Removing these parts can be necessary. Disconnect hoses and electrical connectors carefully to avoid damage. Keep track of all screws and bolts for reassembly. Clearing these obstructions gives better access and makes the reset process easier.
Removing The Old Sensor
Removing the old knock sensor is a key step in the reset process. It requires care to avoid damaging the wiring or the engine components. This section guides you through safely taking out the old sensor.
Disconnecting Wiring
Start by locating the sensor’s wiring connector. Gently press the tab and pull the connector away. Do not pull on the wires directly to prevent damage. Secure the wiring out of the way to keep it safe during removal.
Unbolting The Sensor
Use the correct size socket or wrench to loosen the bolt holding the sensor. Turn the bolt counterclockwise until it comes free. Carefully remove the sensor from its mounting spot. Set the old sensor aside for proper disposal or recycling.

Credit: www.youtube.com
Installing The New Sensor
Installing the new knock sensor is a key step after removing the old one. Proper installation ensures the sensor works correctly and prevents engine problems. Follow the steps carefully to position, secure, and reconnect the sensor.
Positioning And Securing
Place the new knock sensor in the exact spot of the old one. The sensor must sit flush against the engine block. Use the correct bolts or screws to tighten it firmly. Avoid over-tightening to prevent damage. Make sure the sensor does not move or shift after securing.
Reconnecting Wiring
Attach the wiring harness to the sensor’s connector. The plug should fit snugly without forcing it. Check for any corrosion or dirt on the connectors before attaching. Secure the wiring with clips or ties to avoid loose connections. Proper wiring ensures accurate sensor signals to the engine control unit.
Resetting The Sensor Code
Resetting the sensor code is an important step after fixing or replacing a knock sensor. This process clears error codes stored in the vehicle’s computer. It also helps the engine control unit (ECU) recognize the sensor’s correct status. Resetting ensures the check engine light turns off if the problem is solved. Two common ways to reset knock sensor codes are using an OBD-II scanner and disconnecting the battery.
Using An Obd-ii Scanner
An OBD-II scanner is a tool that reads and clears trouble codes from your car’s ECU. First, locate the OBD-II port under the dashboard. Plug the scanner into the port. Turn the ignition key to the “On” position, but do not start the engine. Follow the scanner’s instructions to read the stored codes. After noting the codes, select the option to clear or erase them. This action resets the knock sensor code and turns off the check engine light. This method is fast, safe, and does not affect other car settings.
Battery Disconnect Reset Method
This method involves disconnecting the car battery to reset the ECU. Start by turning off the ignition and removing the key. Open the hood and locate the battery. Use a wrench to loosen the negative terminal clamp and remove it. Wait about 15 minutes to let the car’s computer reset. Reconnect the negative terminal and tighten the clamp. Close the hood and start the car. This resets the knock sensor code and clears other temporary codes. This method is simple but may reset other electronic settings in the car.
Post-reset Checks
After resetting the knock sensor, it is crucial to perform checks to ensure everything works properly. These post-reset steps help confirm the sensor functions well and the car runs smoothly. Neglecting these checks may cause errors or poor engine performance.
Verifying Sensor Installation
Start by inspecting the knock sensor’s placement. Make sure the sensor is tightly secured and connected correctly. Loose or incorrect installation can cause false readings or sensor failure. Check the wiring harness for any damage or loose connections. Clean any dirt or debris around the sensor area to avoid interference. Proper installation ensures accurate sensor signals and reliable engine performance.
Performing A Drive Cycle
Next, take your car for a short drive to complete a drive cycle. A drive cycle involves different driving conditions like idling, accelerating, and cruising. This process allows the car’s computer to recalibrate the knock sensor and other systems. During the drive, monitor the dashboard for any warning lights. If the check engine light stays off, the reset was successful. Performing a full drive cycle helps the car adapt and maintain optimal function.
Troubleshooting Persistent Codes
Persistent knock sensor codes can be frustrating. They often indicate deeper issues beyond a simple reset. Troubleshooting these codes requires careful inspection and testing. This section guides you through key steps to find the root cause and fix it properly.
Inspecting Wiring And Connectors
Start by checking the wiring connected to the knock sensor. Look for any signs of damage or corrosion. Loose or broken wires can cause false codes. Make sure connectors are clean and seated firmly. Use a flashlight to see hard-to-reach areas. Repair or replace damaged wiring as needed. Good electrical connections are crucial for sensor accuracy.
Testing Sensor Resistance
Measure the sensor’s resistance with a multimeter. Refer to the vehicle’s service manual for the correct resistance range. A reading outside this range signals a faulty sensor. Test the sensor at room temperature for best results. Disconnect the sensor before testing to avoid interference. Consistent resistance ensures the sensor detects engine knocks correctly.
When To Replace The Sensor Again
If wiring and resistance tests are normal, consider replacing the sensor. Persistent codes may mean the sensor is faulty or damaged. Use a high-quality replacement sensor for best results. Install the new sensor carefully and follow manufacturer instructions. After replacement, clear the error codes with a diagnostic tool. Monitor the vehicle to confirm the issue is resolved.
Frequently Asked Questions
Will Disconnecting Battery Reset The Knock Sensor?
Disconnecting the battery can reset the knock sensor temporarily by clearing error codes. Use an OBD-II scanner for permanent reset.
How To Fix A Bad Knock Sensor?
Disconnect the battery, remove any blocking parts, replace the faulty knock sensor with a new one, then reconnect everything. Use a diagnostic tool to clear error codes and calibrate the sensor.
What To Do After Changing A Knock Sensor?
After changing a knock sensor, clear error codes using an OBD-II scanner. Then, test drive to ensure proper function. Verify the sensor is correctly installed and check connections for issues.
How Do I Reset My Car Sensors?
To reset car sensors, turn off the engine and remove the key. Disconnect the negative battery terminal first, then reconnect it last. Use an OBD-II scanner to clear specific error codes. Remember, resetting doesn’t fix underlying issues; diagnose and repair problems for lasting results.
What Is A Knock Sensor And Why Reset It?
A knock sensor detects engine knocking and resetting helps clear errors after repairs.
Conclusion
Resetting knock sensors helps your engine run smoothly again. Start with disconnecting the battery to clear errors. Use a diagnostic tool to read and erase codes. Remember, resetting does not fix the sensor itself. Check for any underlying issues if problems continue.
Proper installation and calibration are key after replacement. Drive the car normally to let the system relearn. Keep an eye on the check engine light afterward. Simple steps can save time and avoid costly repairs. Stay patient and follow instructions carefully for best results.